Harrison Wieting
PHYSICS ENTHUSIAST
DRSSTC: Basic Electrical and Mechanical Design
(Double Resonant Solid State Tesla Coil)
This Text will pertain mostly to my DRSSTC1 build. I have the most documentation for that build. Furthermore, because it was my first DRSSTC, I find it appropriate to devote and reference this design and construction information to that particular Tesla coil.
This page will be split into the five main aspects of a DRSSTC.
1) Basic Design
2) The Secondary and Toroid
-construction of the secondary
-construction of the toroid
-finding the resonant frequency
-calculations and data
3) The Primary
-construction of the primary
-tuning of the LC circuit
-calculations and data
4) The MMC
-construction of the MMC
-tuning of the LC circuit
-calculations and data
5) The Control Circuitry and Full Bridge
-How the circuits work
-construction of the control circuitry
-construction of the full bridge
-troubleshooting and debugging
-designing the circuit board
Design how you should design your coil...
A Bit of History...
Nikola Tesla invented the resonant transformer over 120 years ago (around 1891, exact date is not verified). The general design behind the traditional spark-gap type system had stayed unchanged for about 110 years or so. It is a very basic design comprised of an AC voltage source, typically 6kV-30kV or more, a spark gap, high voltage capacitor, and primary and secondary coil system. In the 1970's Many tesla coil hobbyist had experimented with changing the design of the spark-gap system by using flyback transformers from televisions to make the high voltage arcs as well as using vacuum tubes. This is probably the first creation of a 'solid state' type tesla coil. Around 2002, a high school student came up with an idea that would ultimately change the design of tesla coils forever. This new system would be dubbed the DRSSTC, or dual resonant solid state tesla coil. It has a few similarities to the original spark-gap type. The DRSSTC has a tuned primary tank capacitor just like the spark-gap, which is why it is called 'dual resonant', whereas a conventional sstc does not have a tuned primary tank capacitor. Instead we force the primary to resonate at the same frequency as the secondary. The streamer appearance in a DRSSTC is much similar to the spark-gap type too. The differences are of course the use of solid state components, but moreover we are using feedback sampling from either the secondary or primary resonators, over-current fault detection, synchronized gate drive, phase lead adjustment, external modulators generating square wave pulses to interrupt the system, and a bridge topology of powerful transistors to switch the system on and off really fast.
Things to Consider...
There are a lot of parameters to be considered when designing a DRSSTC. Many beginners may have a specific spark length in mind that they want to achieve. This is of course always pondered by the builders of such apparatuses. However, you cannot just base your design by how long you want the sparks to be. Most importantly, you have to go with a design that will work with the power levels you have available to you. You should also be aware of what materials, tools, components, and other equipment that you have, or will have access too. Building a DRSSTC such as mine requires access to a variety of power tools, electrical components, hardware, and lab equipment, not to mention a large work space. More importantly you will need a lot of thinking space, and a lot of free time. Budget is also a major limiting factor, be prepared to spend 5X what you will expect to spend, and be prepared to have plenty of headaches. One last thing i'll add, it can be beneficial to have a project buddy. I built the DRSSTC1 alone, occasionally getting help with things like winding the coil. But having someone else to help you build and also help purchase items will make the project go much more smoothly.
Starting Your Design...
Step One: Size
The next thing to do once you've determined your resources, is to decide the overall size of the system. Do you want a large coil that will be run outdoors only and have the neighbors calling the cops? Do you want a medium coil that can be run indoors or outdoors and still have an impressive output? Or perhaps you want something relatively small and neat. Something that can be easily transported and set up for demonstrations, a table-top tesla coil. You are probably wondering already, how much does this all cost? A large outdoor system can be well over $2000. Of course this all depends on the equipment you have available, you may need to buy expensive power tools and lab/test equipment which will cost a lot. For a large coil, expect to spend a minimum of $1000. For a medium sized coil, expect to spend a minimum of $400. For a small system, expect to spend a minimum of $250. However, many systems can be built for cheap. It is really all relative, and like mentioned above, there are many deciding factors.
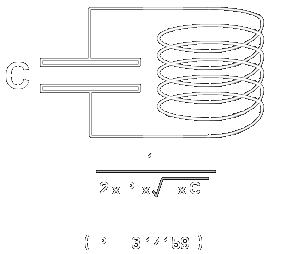
Step Two: The Primary and Secondary
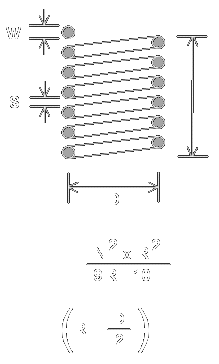
Once you've decided the size of coil you want to build, its time to begin laying out the REAL design factors. You should start with a specific resonant frequency in mind. Say for example you want a system with an operating frequency of 100kHz. You can easily come up with dimensions and specifications for your primary capacitor and primary coil by using the equations shown on the right. I suppose you could also begin by designing the secondary system to your desired resonant frequency, just keep in mind that the primary LC circuit will need to be sized and tuned accordingly. To get a rough estimate of the inductance and self capacitance of the secondary, use L=(N^2 x R^2) / (9R+10H) for inductance, and
5.08 x R/1(0.0563(H/R)+0.08+0.38 x sqrt(1/(H/R))) for self capacitance. I've found that these equations are about 85% accurate. It is always good to take averages to refine your results. Also, if math scares you, use the wonderful programs like JavaTC and ScanTesla to have all of your values and parameters equated for you! JavaTC is a must if you are not going to do the math yourself. You absolutely cannot build a working DRSSTC without computing a few basic formulas. I didn't use JavaTC or ScanTesla most of the time I did the math myself. All you really need to know is how to calculate the natural resonant frequency of your primary LC and secondary LC so that you can properly tune your system. Other factors may be good to know, especially if you are building a tesla coil of larger proportions than my DRSSTC1.
Step Three: The Control Circuitry
When you have your primary and secondary parameters, the next step is to design or find a schematic that you want to use. There are many well known and reliable schematics available online. You should try to look for one that includes a parts list, at the least. You can even find some that have free PCB artwork available. Also, check ebay, you might be able to find some of Steve Ward's universal driver boards for cheap. I made my own circuit boards using the ultraviolet exposure method. It was very easy, cheap, fast, and I got professionally looking results. Use mouser and digikey to obtain all of your basic board level components. Ebay and Amazon are also good choices for transformers and bulk items like MMC capacitors. Other companies that sell tesla coil specific parts, like Eastern Voltage Research, can be expensive, but when you buy from them you are getting only the best quality and great customer service. There is an alternative to all of this. The obvious, buy an already made circuit. Don't do that, it's just no fun and you wont learn anything. Majority of your expenses on a project like this will be with the components, especially the primary tank capacitors, IGBT's and high voltage bridge power supply. For first-timers, it would be wise to purchase bulk amounts of components. Do not simply buy exactly what you need. What I mean by this is that if your circuit calls for 10x .1uF ceramic capacitor, 4x 470 ohm resistor, etc... then buy 100x .1uf caps and 40x 470 resistors. First of all, suppliers don't like when they have to open a reel of 5000 components just to sell you a few of this and a few of that. Secondly, when you by in higher multiples, you often get items way cheaper. Thirdly and most importantly, remember when I said "be prepared to spend 5X what you will expect to spend?" You will most definetly have components that will fry, short circuit, blow up, fail, die, etc.. Mistakes happen whether they are preventable or not. Even the best tesla coilers make them. I remade my driver circuitry six times before I got it to work with no problems at all. So it is better to buy a truck load of parts and pay shipping costs once, then to end up paying more on the shipping then your whole system put together. So what are you waiting for? Order your components and get to soldering! I'd also like to note that when tackling a project such as this, your solder skills are only going to be as good as the soldering iron and solder that you use. Don't waste $15-$20 on those cheap 40W soldering iron's that plug directly into the wall (like the ones you see at radioshack). Get a nice soldering station like the one in the image to the right. You will want something that has adjustable temperature and a quality chisel tip that doesn't corrode. Make sure that the replacement tips are easy to find before you buy a solder station too. You can pick one of these up from amazon or ebay for $60-$80. Only use 60-40 rosin core solder. The single core stuff is okay, but multicore is better. Don't use the lead free stuff either.
Step four: Gather Materials and Start Building!
There ain't nothin' to it but to do it! I will not be covering how YOU should construct YOUR OWN tesla coil. That is all the fun for you. Although, I will try to be as detailed as I can with how I constructed my DRSSTC1 in the following text.

Invented by Nikola Tesla around 1891.
Click images to enlarge

The typical DRSSTC design. Image can be viewed at http://www.easternvoltageresearch.com/resources/drsstc2_systemschematic.pdf

My Project Buddy

This is the soldering iron I use. Absolutely great device. Highly recommend this or similar item

A beautiful small arc
The Secondary & Toroid
-construction of the secondary
-construction of the toroid
-finding the resonant frequency
-calculations and data
Winding a coil can be one of the most frustrating parts of building a medium to large tesla resonator. It require's patience, a lot of time, and steady hands. The first coil I wound for this project can be seen below. I wound it completely by hand with help from another person holding the spool of wire. Basically, The first resonator was made with a 21 inch winding of 30AWG copper enamel magnet wire on a 6 inch OD PVC form with two 6 inch PVC end caps. I drilled holes in the center of the end caps so I could put a metal rod through the center and set it on a rig. From there it was about 5 or 6 hours of carefully wrapping the wire turn by turn, all by hand. This did not work well for me in the end. I've wound other coils by hand with great success, but this one could have been better. In the end, I did not use this coil.

I decided to remake the coil. This time, I bought a brand new 6 inch OD PVC pipe, 24 inches long. I'll also note that this was not your regular white colored PVC pipe that comes in a 10 foot long piece, those are usually 6.5 inch OD anyways. This pipe is the turquoise-green drain pipe that comes in a 24 inch piece, 6 inch OD. Absolutely perfect for a tesla coil form! I planned to make this one a 20 inch winding of 30AWG wire so that I would have 2 inches on each end. The first thing I did was use some 80 grit sand paper and sand the entire pipe many times to get all of the black ink off of it as well as any bumps that might make the winding irregular shaped. Then I did the same thing with some 220 grit sand paper to smooth it all out. Next I sprayed windex all over it and wiped it completely clean and let it completely dry. I don't think I need to explain why you don't want any water or moisture on your tesla coil! I used some clear coat enamel spray, and sprayed a few thin layers of enamel on the smoothed form to give it a nice glossy form and also allow for the wire to slide on the coil smoothly.
Once this was dry, I made a new way to enclose the ends of the pipe. I bought some small square pieces of acrylic at Lowes and used a dremel tool to cut out two circles for the ends. Below is the only picture I have to show this. You are looking at the bottom side of the PVC. Before I mounted on the acrylic circle, I drilled five holes. One in the center that you can see, which is for the winding jig rod. The other four holes I epoxied four 1/4 inch x 2 inch nylon screws that are used to mount the coil to the base structure. I had to do this twice. The first time I used some regular all purpose epoxy. For some reason this didn't work very well and the ends fell off. So I bought some Plastic epoxy, specific for acrylic and PVC, this stuff smells so strong, but it did the job.


Now for the winding. Unlike winding completely by hand before, I made a new make-shift winding jig powered by an old plug in drill. I used a small variac to limit the power to the drill and thus control the speed of the drill. I tightened the chuck around the rod that
Page Under Construction. To Be Continued...